Ultiboard is a simple PCB design tool. You need to draw the board outline, place the parts and set the board dimensions. You need the correct dimensions so that your board will work properly and the factory can make it.So it is important to know that how to change pcb board size in ultiboard.
What are the sizes of a PCB circuit board?
Circuit board dimensions refer to width and height in millimeters or inches. These numbers determine the shape and edges of the circuit board. The dimensions affect where the parts are located, where the wiring goes, where the holes are located, and how the factory puts the board together on the panel. Good dimensions should comply with tooling limitations and factory regulations.
You must use the correct size. If the board is too small, parts or holes will fall beyond the edges. If it is too large, you waste material and increase costs. A good rule is to leave about 0.5 inches (12 mm) of clearance between each part and the edge. This clearance makes routing and drilling easier and avoids cutting parts.

how to change pcb board size in ultiboard
The Importance of Correct PCB Size
If the board is too small, parts or holes will sit outside the edges. If it is too large, material is wasted and costs are increased. There should be about 0.5 inches (12 mm) of space between parts and edges. This clearance helps with routing and drilling, and avoids cutting off parts.
Common PCB board sizes
Some common sizes for the Arduino Uno are 68 × 53 mm. Smartphone boards are approximately 50 × 120 mm. ATX motherboards measure 305 × 244 mm. Mini-ITX motherboards measure 170 × 170 mm.
Step-by-Step Guide for Changing the PCB Board Size in Ultiboard
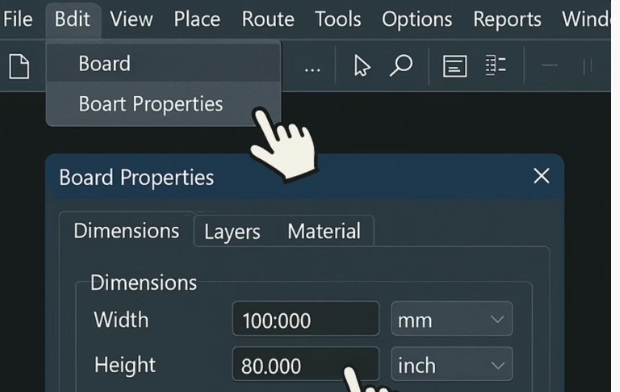
To change the board size, open the PCB file in Ultiboard. Then click Board > Board Properties. You will see fields for Width, Height, and Units (mm or inches). Type in the new width and height. Switch the units if needed. For odd-numbered shapes, select Custom Shape and draw or type the points. Next, set the origin (0,0) to a corner that you know will be the correct alignment for the part in your case.
Before you finish, make sure that all holes, power areas, and silkscreen markings are within the outline and that there are no marks across the edges. Then click View > 3D Preview to see the board in 3D. This view shows the actual dimensions of the board. Note that if you change the dimensions after placing the parts, you may need to rewire the board.
If you see parts that are outside the outline, the Ultiboard marks them in red. Move these parts back inside. If the tracks are disconnected, repair them using Routing > Rebuild Connections. If the board dimensions are reset, save the file and unlock the Dimensions field in Board Settings before trying again.

how to change pcb board size in ultiboard
Conclusion
How to change pcb board size in ultiboard can usually be done by following the steps below:
Open the PCB file: Start the UltiBoard software and open the PCB design file that needs to be resized.
Enter Edit Mode: Find and click the “Edit” option in the software interface to enter the editing state in order to modify the PCB.
Select the board frame: In the PCB editing interface, find and select the graphic object that represents the border of the PCB board. Usually, the board frame will be displayed in a specific color or style to facilitate user identification.
Resize: After selecting the board frame, you can resize it in the following ways:
Direct Drag: Place the mouse pointer on the edge or corner of the board frame, and when the pointer becomes a draggable icon, press and hold down the left mouse button and drag to resize the board frame. During the dragging process, you can observe the change of size until you reach the desired size.
Input the value: In the property panel of the software or the related editing window, find the parameters related to the size of the board frame, such as length, width, etc., directly input the new size value, and then press the Enter key to confirm the modification.
Confirm the modification: After completing the size adjustment, check whether the layout of the PCB board and the position of the components are affected. If necessary, the components can be re-layout or adjusted. After confirming that there is no error, save the PCB file.
In summary, how to change pcb board size in ultiboard, open Properties. Then set the new width and height. Then, fix any overlaps. Then, run a rule check. Finally, do one last 3D review. That way, your design will be compliant and ready for production. With a little practice, you'll be able to change dimensions quickly and without error.